RSS
-

Pinkbike review the TD:1
shedfire
-

Ragley 2011 :: Fat Head Tubing
We love steel tubing – and so do you guys – our steel frame outsold our alloy one by a factor of 10:1 (well, until someone dropped the price right down to clear the alloy ones out!). But steel tubing was a bit of a dull thing. We thought we’d spend time thinking and working on it to make it better.
How do you improve on a product that’s been around for ages? Show it off!
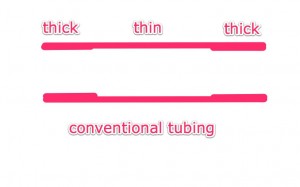
Conventional tubing is very clever. It starts off as a round tube with all the tube the same thickness throughout. Then, using metal trickery, the tube is thinned in the centre – BUT THE OUTSIDE DIAMETER STAYS THE SAME. It’s a drawing and re-drawing process, and it’s very neat and smart, but basically it hides all the clever stuff away inside.
Everyone uses tubing like this. It’s really hard to make, but that uniform outside diameter, with hidden thinned walls is the way its done. We thought that was silly.
For our first Blue Pig frames, we used a tube on the top tube of the bike that had a thicker section at the head tube end. This tube was originally designed as a seat tube, but we liked the thicker head tube section which let us do clever things with transfer gussets and stuff to beef the front of the frame up without adding too much stiffness. Remember – a larger diameter tube is stronger than a smaller diameter one of the same weight. But it’s a lot stiffer too. And whilst stiffness is great in some areas of a bike, too much stiffness in some areas is bad.
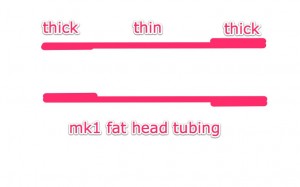
Our Mk1 Fat head tubing therefore, was just with an external butt at the end. The tube just got thicker, but stayed the same diameter inside. It was half way there. We liked the external bulge, and it did a lot in terms of strength, but we knew we could do it better.
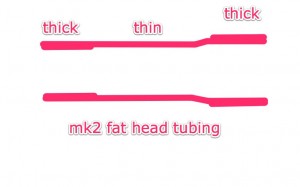
 And lo… Mk2 Fat Head Tubing. The stressed end of the tube gets fatter, as well as the wall getting thicker. Taming those stresses with increased diameter and increased wall thickness, all in a dynamic way you can see. We use this on all our steel frames for this year. It means we can remove external saddle gusseting though of course, we still keep our box-head gusset on the back of the head tube which braces the back of the head tube and strengthens the junction of the main tubes and the head tube.
shedfire
-

Ragley 2011 : 44mm headtubes
The inch-and-an-eighth headset is pretty old now. Certainly 180mm singlecrown forks weren’t around when it was conceived, and the recent advent of the “tapered fork” has given it another death-knell.
Headset standards are steered by the needs of production bikes. And most production bikes are aluminium, or carbon. Very few are steel. We have used alternative headset sizes on a frame before – our 2009-2010 model Mmmbop frame used a 1.5in because the large downtube sat well with a large headtube.
Fathead tubing (see previous) was pushing downtubes out beyond the 38mm that our old head tube was on the longer travel bikes. And so we needed to simply add more metal to the head tube to get it to the diameter we wanted to weld it up right. Or go bigger.
Earlier in the year, Cane Creek announced a new headset that allowed people to fit tapered steerer forks to bikes that had 1.125in internal headsets. We liked that, and infact, we’d been paying attention since it was first discussed back in January on the mtbr frame forum. We have since played about with a true “integrated” steel headtube, with bearing races part of the frame, but productionwise it was a nightmare. And so, in conjunction with Nukeproof (well, we design for them too) we stepped proudly to a new kind of standard, with our own headset range to cater for everyone. Thankfully, with Cane Creek on board with this standard too, there is some choice, and even Chris King is joining the party apparently.
Options for headsets are:-
1.125in internal (flush fit, low ride height)
1.125in external lower (flush top, external lower cup to maintain correct geometry and give downtube clearance).
1.5-1.25in tapered (flush top, external lower cup). << tapered steerer!
1.5in (external top and lower cups) << yes – 1.5in steerer on a steel frame!
We’re really pleased with the way the new headtubes are working out – the frames look balanced, are strong (stronger than before!) and the fork fitment options have increased massively.
shedfire
-

Ragley 2011 :: WTF is them seatstays?
Yeah – we changed quite a bit on the new frames, and the new seatstay profile is probably the most visible. We’re sure lots of people are going to hate them, but we’re pretty pleased (about the stays, not about the hate bit).
First edition Ragley’s used our old “big bits of plate with holes in it” construction technique. We’ve got a bit more refined over the last year, and we were particularly keen to remove excess weight, without sacrificing anything. We had a sample frame built with some tiny hooded dropouts, and we really liked them, so set out to get things to fit in the usual way, without using more metal than we had to.
And so thats why the seatstays now get a bend, which clears the brake caliper, and concievably, yes, adds some more “spring” to the rear end (though we’re not convinced rear triangles flex very much as they are a triangle, and triangles are not known for flexyness).
shedfire
-

Ragley 2011 :: New Blue Pig
shedfire


