Latest Updates: ragley RSS
-
shedfire
-
shedfire
See and download the full gallery on posterous
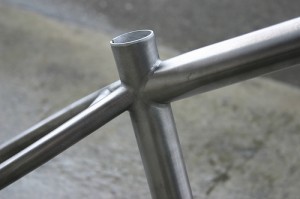
Just in, first shots of our chromoly frame, with our factory burning the midnight oil. Off to SGS now for CEN testing. Gusset under downtube and externally butted top tube, with the transfer gusset taking some of the pressure off the downtube joint alone, reinforcing the headtube so it doesn’t bend – that’s the theory!
-
shedfire
I should have my first (well 2nd actually) sample in a week and a bit. The first sample we saw in Taiwan I’d got a bit carried away with wall thicknesses.
Sample landing has:-
4130 double butted chromoly, including my coolest ever tubeset (externally butted top tube, get in!)
Same funky dropouts and chainstay plate thingy (that I still don’t have a name for).
Sample coming in a burnt orangey sort of colour.
Name is Ragley Blue Pig.
Price circa £250ish.
27.2mm post, 1.125in headset, 68mm BB shell, 135mm rear spacing, 29.8mm seatclamp.
Not sure whether it’s going to have bolt on cable guides or not yet. Perhaps not.
The Blue Pig is a downhill from Heptonstall to the Blue Pig Working Mens Club in Midgehole. Local favourite.
http://www.geograph.org.uk/photo/142539
More soon!
-
shedfire
For a brief time yesterday afternoon, all of the Ragley’s cables were going to go under the downtube. I asked Ed to come around and see what he thought, he slapped me, and I put ’em back like they were.
Then in a moment of “does it have to be like that”, I’ve revised it again, and now have all three control cables/hoses under the top tube, and then the disc brake hose routing under the seatstay to the chainstay mounted caliper. To work right, the brake caliper needs an adjustable banjo connector. It works perfectly about 80% of the brakes I checked out the other day and 100% of the ones I’d actually consider using.
Keeps the downtube and chainstays clear. We’ve got some lovely CNC’d cable guides coming, courtesy of Ginger Shen from the Yozu Metal Company.
Lynskey are on with water-jetting dropouts and other parts – a slight revision to the seatstay brace too (for their welders sanity) and we’re looking good for production.
Oh, and the steel and alloy samples should be in transit this time next week. We can’t wait!
-
shedfire

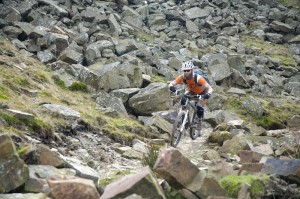
Just got back from an afternoons messing at Lee Quarry. Great spot for pushing limits and getting used to riding fast over very big pointy rocks. And berms. And doubles. And skinnies.I won’t do all that “the bikes rode really well” thing, but they did. The funny thing was that it wasn’t until half way through this afternoon Ed pointed out I had a 36t ring on my crank (an SLX 22,36 double), when I mentioned in this post earlier that thought I had a 32t. Which means I’ve been riding 4 teeth higher than I thought I had, and not really noticing it.
And I was very glad of all of the 36 teeth on there, getting pretty spun out and ZOOOOM running down towards the bottom of the DH there, over the cute jumps and stuff.
Top time. Lee Quarry. Worth a visit, and if you want to combine a trip there with a skill session – Ed can help you there too.
Here’s a vid of what we got up to.
Singletrack Classic Weekender – Downhill from Singletrack Magazine on Vimeo. -
shedfire

“Rear-facing Seat-Post slot. Tut, tut, tut.” said “Jambon” on STW.Well I know what you mean, and what you’re thinking.
But.
1. Because I’m using much less seat tube extension above the top tube on these new frames than I have in the past as it means you can run your post higher for a given frame size (the post should engage to half an inch below the bottom of the weld between the seat tube and top tube). As there is more metal at the rear of the seat tube, so putting a slot in it has far less effect than putting it at the front – ie: ITS STRONGER THIS WAY.
2. I am far from convinced there is actually any difference in terms of “goop going down the seat tube” with front or rear slots. I know it’s something that’s often quoted, but I’m really not sure it’s any different, and bearing in mind point 1, I know what I’d rather do (which is why I did it). -
shedfire
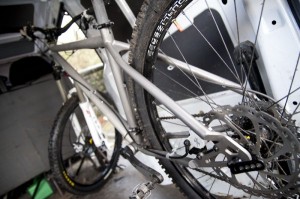
I’ve put a lot of work into the chainstay area on the Ragley’s, and here’s a vid to show the clearance we’re getting. It’s the best I’ve seen of any titanium production frame.
Ovalising tubing is heavily frowned upon by Lynskey, apparently leading to failure in fatigue, unless you start with very soft tubing! -
shedfire

Ti frames offer interesting and different finishing options. In the past I’ve done frames in both brushed (shiny) and blasted (matt satin) finishes.
Satin is much cheaper than brushed. You blast the frame and it smooths the surface to one neutral finish. Brushing costs a lot more. Because a guy has to go all over the frame and get a consistent brushed polish all over it. Lynskey can do mirror polishing too. But it takes one guy about two days to do it. And it’d scratch up on a mountainbike.
I like industrial finishes. The Japanese call it Wabi-Sabi.I got into this wabi-sabi stuff particularly from following the creations of motorcycle designer Shinya Kimura. He does ace work. And loves bare, just-worked finishes. I love it too.
So I have been working with Lynskey on a new finish. I wanted frames straight off their welding tables. With all the marks still on them. They were unhappy about that. People often over-analyse Ti frames, and they weren’t happy about them going out super-raw.
We’ve reached a compromise on the finish, or rather lack of finish. Ragley frames will be “scrappy brushed” – just to remove welding debris – rather than brush polished or media blasted. Gives a totally individual raw industrial finish which will age wonderfully, polish as your knees rub it, be easy to buff big scratches out of (which you can’t do on a satin).We’ll have some ace stickers which are going to look punchy and poppy and cool against the raw finished Ti. And if you want to sit there for a while with a pan scourer and some furniture polish, you can do it to your hearts content.
Of course, if you’re one of those people who is going to go down the “I’ve paid all that money for a frame I want it to look beautiful”, you’ll be getting the idea that this isn’t the model for you.
-
shedfire
OK global bike companies. Here’s the numbers for the best riding trail hardtail around. Get copying now! All geometry listed at ride height with 25-30% fork sag.
Frame Size Top Tube (effective) Head Angle Seat Angle Chainstay BB Drop BB Height with 2.5’s 16in 23in 67.5deg 73deg 16.73in 0.8in 12.4in 18in 23.5in 67.5deg 73.5deg 16.73in 0.8in 12.4in 20in 24in 67.5eg 74deg 16.73in 0.8in 12.4in Seat tube diameter :: 34.9mm outside (constant), 31.6mm inside (seatpost size).
Headtube :: 1.125in standard external.
Geometry is set for contemporary 140mm travel forks. It will happily take 130’s or 150’s.Updated:: Friday late afternoon.
So – what’s different? Well, it’s a series of tweaks that I’ve not seen anyone combine in one place before. The 67.5deg head angle is pretty slack by most peoples experiences, but combined with a long top tube and a short stem gives a bike that handles incredibly well at speed, through the rough, yet retains a quickness when you need it. It’s great. We recommend at 50-60mm stem.
Seat angle is steep and gets steeper the bigger the frame. This lets us use a short back end for good stood climbing, but also keeps your weight forward when you’re sat, going up. The steeper seat angle is to stop big lads sitting right back over the back wheel and looping out. It’s the reverse to what normally happens – the other option would be making the rear stays longer on bigger frames, which I didn’t fancy.
Seat tube is reamed for a 31.6mm post – so that you can get a dropper type post in there. It’s noticeable that a bigger post DOES seem to transmit more shock, but if you’re that offended, shim it to 27.2mm. I like to solidity of it, and the Ti back end definitely takes the edge off. Plus get the saddle out of the way when you’re hammering eh! -
shedfire
« Previous Page — Next Page »


